

In the visually-driven world of modern commerce and digital media, the quality of your imagery can make or break your brand. Whether you are an e-commerce entrepreneur trying to sell the latest fashion trends, an advertising agency crafting a global campaign, or an independent creative, the imagery you present must be flawless. This is where the magic of photo editing comes into play. Specifically, mastering clipping path services and background removal for graphic design is a non-negotiable skill—or a crucial service to acquire—for anyone serious about visual communication. Check out clippingpathwise.com to know more
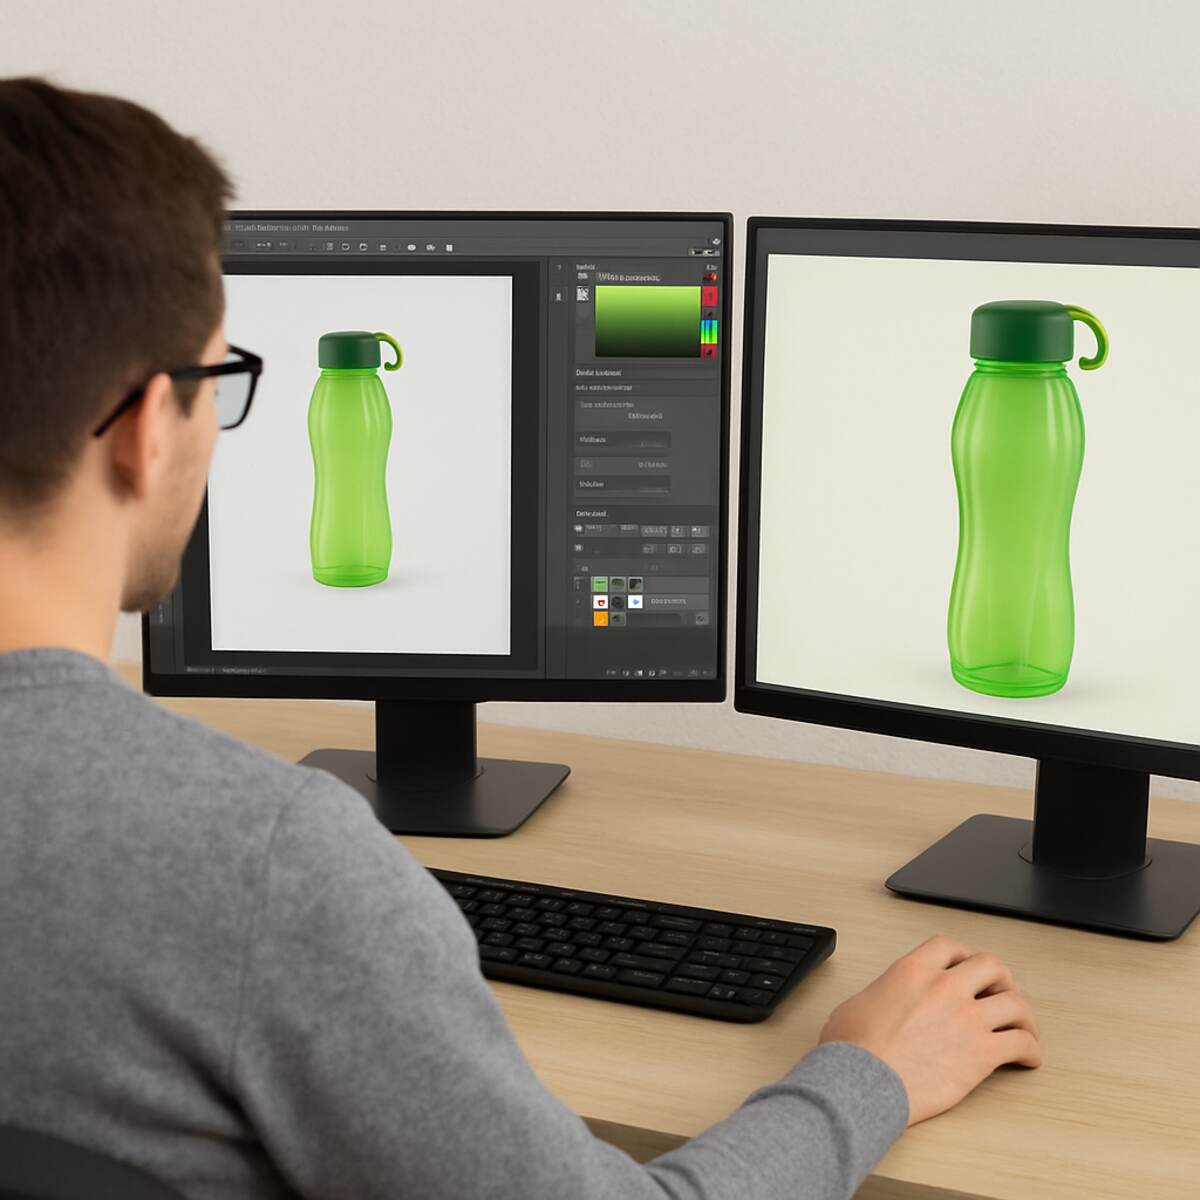
Creating stunning, distraction-free product photos is not just about pointing a camera and clicking a button. It requires a meticulous post-production process. In this comprehensive guide, we will dive deep into the world of image isolation. We will explore advanced techniques, compare tools, discuss the business of photo editing, and uncover exactly how these services transform ordinary photos into compelling, high-converting commercial assets.
The Core Fundamentals of Image Isolation
Before we explore advanced post-production strategies, it is essential to understand the foundational elements that enable high-quality graphic design. At the heart of most commercial image manipulation lies the need to separate a subject from its environment.
What Are Clipping Path Services?
In the realm of digital imaging, a clipping path is a closed vector path or shape used to cut out a 2D image in image-editing software such as Adobe Photoshop. Everything inside the path is included after the clipping path is applied; anything outside the path is omitted.
Clipping path services are professional offerings in which skilled graphic designers manually draw paths around subjects. Because these paths are created from vector points, they produce sharp, clean, and well-defined edges. This is fundamentally different from using a basic eraser tool or a magic wand selection, which often leaves behind pixelated, messy borders.
The Role of Background Removal
Background removal is the broader process of removing a photograph’s background to isolate the primary subject. While a clipping path is a specific technique used to achieve this, the goal is background removal.
In professional graphic design, background removal serves several critical functions:
- Focus: It eliminates background clutter, forcing the viewer’s eye directly to the product or subject.
- Versatility: Once a background is removed, the subject can be placed on a pristine white background (standard for e-commerce), a custom branded color, or seamlessly integrated into a complex composite image.
- Consistency: For product catalogs featuring hundreds of items photographed in varying lighting conditions, removing the background and replacing it with a uniform backdrop creates a cohesive, professional look.
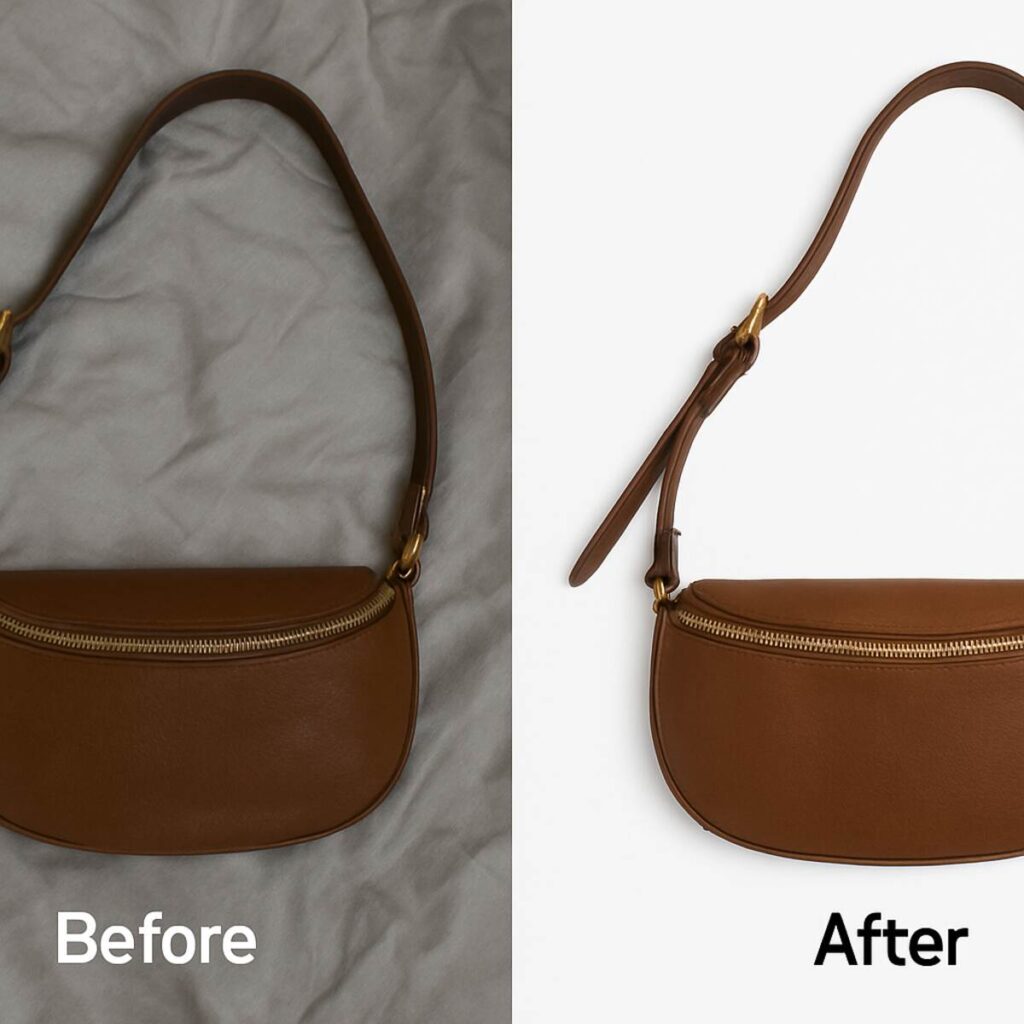
The Undeniable Benefits of Professional Image Cutouts
Why do global brands invest millions into image post-production? The answer lies in consumer psychology and brand perception. Let’s break down the tangible benefits of utilizing top-tier background removal and clipping path techniques.
1. Elevating Brand Perception
When a potential customer lands on your website, they make a subconscious judgment about your brand’s credibility within milliseconds. Blurry images, inconsistent backgrounds, and poorly cropped products scream amateurism. Conversely, crisp edges, consistent lighting, and distraction-free backgrounds signal professionalism, quality, and trustworthiness.
2. Boosting E-commerce Conversion Rates
In online shopping, the customer cannot pick up, touch, or try on the product. The photograph is the only reference they have. High-end image masking for e-commerce ensures the product is accurately and attractively represented. A clean, transparent background for product catalogues allows you to showcase the item from multiple angles without distracting the buyer, directly correlating with higher add-to-cart rates and fewer returns.
3. Compliance with Marketplace Standards
If you sell on platforms like Amazon, eBay, or Google Shopping, you don’t have a choice when it comes to image editing. These platforms have strict image guidelines that require the main product photo to be on a pure white background (RGB 255, 255, 255). Professional clipping path services guarantee that your images meet these strict criteria, preventing your listings from being suppressed or banned.
4. Ultimate Design Flexibility
For art directors and graphic designers, isolated images are like raw ingredients in a kitchen. When you have a perfectly cut-out image, you can integrate it into banners, social media posts, billboards, and brochures. This flexibility is the cornerstone of modern graphic design, allowing a single product photo to be repurposed across dozens of marketing channels.
Mastering the Tools: Precision in Photoshop
Achieving a flawless cutout requires deep knowledge of the software. Adobe Photoshop remains the industry standard, and understanding its tools is paramount for any creative professional.
Pen Tool Techniques for Precise Object Isolation
The Pen Tool is the holy grail of clipping paths. Unlike selection tools that rely on contrast and color recognition, the Pen Tool relies entirely on human precision. It creates vector paths by connecting anchor points with straight lines or Bezier curves.
Here are advanced pen tool techniques for precise object isolation:
- Zoom In for Accuracy: Never try to clip an image at 100% zoom. Professional editors zoom in to 300% or even 500% to ensure the path stays exactly on the boundary of the object, typically 1 to 2 pixels inside the edge to avoid capturing any background color (often called “halo” or “fringing”).
- Minimize Anchor Points: A common beginner mistake is clicking hundreds of times to create a curve. The secret to smooth, natural-looking edges is using as few anchor points as possible. Click, hold, and drag the Bezier handles to match the object’s natural curve.
- Master the Alt/Option Key: When changing direction sharply (creating a corner), hold the Alt (Windows) or Option (Mac) key and click the last anchor point to break the directional handle. This allows you to start the next curve in a completely new direction without warping the previous one.
- Close the Path Correctly: Always ensure you click your initial anchor point to close the loop. An open path will not function correctly when converted to a selection or vector mask.
How to Create a Vector Clipping Path
Creating a vector clipping path is essential when sending files for printing or when placing images in layout software like Adobe InDesign. Here is the professional workflow:
- Open your image in Photoshop.
- Select the Pen Tool (shortcut: P). Ensure the tool mode in the top options bar is set to “Path,” not “Shape.”
- Carefully draw your path around the subject using the techniques mentioned above.
- Once the path is closed, navigate to the “Paths” panel (Window > Paths).
- You will see a “Work Path.” Double-click it and name it (e.g., “Path 1”) to save it. If you don’t save the work path, it will be overwritten the next time you use the Pen Tool.
- Click the fly-out menu in the top right corner of the Paths panel and select “Clipping Path.”
- Select your named path from the dropdown. Leave the “Flatness” device value blank unless your printer specifies it.
- Save the image as an EPS or TIFF file. When imported into InDesign or Illustrator, the background will be perfectly transparent, dictated by the vector path.
Conquering Complex Edges: Beyond the Pen Tool
While the Pen Tool is perfect for hard-edged objects like electronics, furniture, or packaging, it falls completely flat when faced with complex, soft edges.
Clipping Path vs Image Masking
One of the most common questions in the photo editing industry is how to understand clipping paths vs. image masking.
- Clipping Path: Best for hard, solid, straight, or smoothly curved edges. It uses a vector line to cut out objects. Examples: Smartphones, mugs, shoes, cars.
- Image Masking: Best for soft, complex, intricate edges where a hard vector line would look unnatural. It uses pixel-based selections and Alpha channels to separate the subject from the background. Examples: Hair, fur, feathers, smoke, translucent fabrics, chainlink fences.
Using a clipping path on a model with flowing curly hair will result in a “helmet hair” effect—it looks unnatural, plastic, and strictly amateur. For these scenarios, we must rely on masking.
Refining Hair and Fur Edges in Masking
Learning how to remove complex backgrounds in Photoshop involves mastering the Select and Mask workspace (formerly Refine Edge).
Here is a step-by-step approach to refining hair and fur edges in masking:
- Initial Selection: Make a rough selection of the subject using the Quick Selection Tool or the Object Selection Tool. Do not worry about getting every strand of hair perfectly.
- Enter Select and Mask: Click the “Select and Mask” button in the top toolbar.
- View Mode: Change the view mode to “On Black” or “On White” (whichever contrasts best with the subject’s hair) and push the opacity to 100%. This reveals the imperfections in your initial selection.
- Refine Edge Brush: Select the Refine Edge Brush Tool from the left toolbar. Carefully paint over the edges of the hair or fur. Photoshop’s algorithm will calculate the difference between the foreground (hair) and background pixels, stripping away the background while keeping the fine strands.
- Decontaminate Colors: If the original background color is reflecting onto the hair (color fringing), check the “Decontaminate Colors” box in the output settings. This will gently shift the color of the edge pixels to match the surrounding hair.
- Output: Always output to a “New Layer with Layer Mask.” This adheres to a non-destructive photo-editing workflow, ensuring you can always go back and paint on the mask if you make a mistake.
Fixing Jagged Edges in Image Cutouts
Sometimes, despite your best efforts, a cutout might result in pixelated or jagged edges—especially if working with lower-resolution source files. Fixing jagged edges in image cutouts is vital for maintaining a premium look.
To fix this:
- Ctrl-click (Command-click on Mac) the layer mask to load it as a selection.
- Go to Select > Modify > Smooth. Enter a small radius (1-3 pixels) to round out the sharp, jagged pixel edges.
- Next, go to Select > Modify > Feather. Feather it by 0.5-1 pixel. This slightly softens the edge, mimicking a natural photographic depth of field.
- Invert the selection (Ctrl/Cmd + Shift + I) and fill it with black on the layer mask to apply the smoothed, feathered edge.
E-commerce Specializations: Taking Products to the Next Level
The e-commerce industry demands highly specialized photo editing techniques to make products look their absolute best. Two of the most sought-after services are the ghost mannequin technique and advanced color correction.
The Ghost Mannequin Effect for Clothing Photography
Apparel is notoriously difficult to photograph. Lying clothes flat (flat lay) can make them look lifeless and wrinkly. Hiring live models is highly expensive and requires organizing makeup, styling, and model releases.
The perfect middle ground is the ghost mannequin effect for clothing photography (also known as the invisible mannequin effect). This technique gives clothing a 3D, hollow, worn appearance without a visible model or mannequin, allowing the customer to clearly see the fit, drape, and interior lining of the garment.
How it works:
- Photography: The garment is photographed on a mannequin. A second photograph is taken of the garment turned inside out (or just the collar/inner back section) to show the inner label and back lining.
- Clipping: A graphic designer uses a clipping path to cut out the garment, entirely removing the visible parts of the mannequin (neck, arms, chest).
- Compositing: The image of the inner collar/lining is warped, resized, and composited into the empty neck space of the main image.
- Shadowing: Realistic internal drop shadows are painted in to give depth, making the hollow space look authentically 3D.
This technique requires a meticulous eye for detail, as the geometry of the garment’s front and back must align perfectly.
Multi-Clipping Paths for Color Correction
In product photography, it is rarely cost-effective to photograph a product in every single color variation it comes in. Instead, photographers shoot one base color, and post-production specialists create the other colors digitally. This requires using multi-clipping paths.
Multi-clipping paths involve creating multiple, separate vector paths within a single image to isolate different parts of a product.
For example, imagine a photograph of a sneaker. A photo editor will create separate paths for:
- The rubber sole
- The leather upper
- The shoelaces
- The brand logo
By isolating these elements individually, designers can apply specific Hue/Saturation or Curves adjustment layers to each part. This enables multi-clipping paths for color correction to be executed flawlessly. You can change the upper from red to blue, make the laces neon green, and keep the sole pristine white—all from one master photograph. This saves e-commerce businesses thousands of dollars in photography costs and ensures the lighting and angle remain perfectly consistent across all color variants.
The Post-Production Workflow for High-End Advertising
Advertising agencies require a level of perfection that goes far beyond standard e-commerce white-background cutouts. Post-production techniques for advertising images involve blending isolated elements into complex, hyper-realistic composites.
Maintaining a Non-Destructive Photo Editing Workflow
Whether you are working on a simple background removal or a massive billboard composite with 200 layers, professional graphic design relies on a non-destructive photo editing workflow.
Non-destructive editing means making changes to an image without overwriting or permanently altering the original pixel data.
- Layer Masks instead of the Eraser Tool: Once you erase a pixel and save the file, that pixel is gone forever. Using layer masks lets you hide pixels with black and reveal them with white. If a client asks for more of the background to be shown two weeks later, you simply paint the mask white.
- Adjustment Layers instead of Image > Adjustments: Applying a brightness tweak directly to a layer permanently bakes in those changes. Adjustment layers sit above the image, acting as filters that can be tweaked, turned off, or deleted at any time.
- Smart Objects: Converting a layer to a Smart Object before scaling it down ensures that if you need to scale it back up later, it retains its original resolution.
By adhering to a non-destructive workflow, clipping path services ensure that the end client has maximum flexibility to tweak the design without having to start from scratch.
Crafting the Advertising Composite
Once elements are cleanly extracted via clipping paths and masking, they are brought into the advertising composite. This involves:
- Perspective Matching: Ensuring all isolated elements share the same vanishing points.
- Lighting and Shadows: A cutout element will look fake if its lighting doesn’t match the new background. Editors must manually paint in contact shadows (where the object touches the floor) and cast shadows (the shadows that stretch away from the light source).
- Color Grading: Using adjustment layers to apply a uniform color palette over the entire composite, binding the newly placed objects to the environment seamlessly.
The Great Debate: Professional Editors vs. AI Tools
In recent years, the market has been flooded with artificial intelligence (AI) tools promising one-click background removal. Software features like Photoshop’s “Remove Background” button and web-based tools like Remove.bg have made tremendous strides. This begs the question: are manual clipping paths obsolete?
The definitive answer is no. Here is an in-depth look at why professional clipping paths are better than AI tools for high-end commercial work.
1. Edge Precision and the “Halo” Effect
AI works by looking for contrast between the subject and the background. While it is incredibly fast, it frequently struggles with edge precision. AI tends to leave a 1-2 pixel “halo” of the old background around the subject, or conversely, it bites too far into the subject, chopping off small details like the tip of a shoe or the corner of a box. A professional using the Pen Tool controls the path pixel by pixel, guaranteeing a flawless edge.
2. Low Contrast Scenarios
If you are photographing a white coffee mug on a light gray background, AI will almost always fail. The algorithms cannot distinguish where the mug ends and the background begins. A human editor, however, understands the geometry of a mug and can draw a perfect path regardless of color similarity.
3. Understanding Intent and Context
AI does not know what your product is; it only sees pixels. If a product photo includes a prop (e.g., a watch resting on a decorative stone), the AI might cut out the watch and the stone together, or it might cut out the stone and delete the watchstrap. A human editor reads the creative brief, understands that the watch is the hero product, and isolates it accordingly while removing the prop.
4. Vector Requirements
AI background removers output raster graphics (usually PNGs with transparent pixels). However, many printers, packaging designers, and legacy publishing workflows strictly require vector clipping paths (EPS/TIFF formats) to process images correctly. AI cannot generate clean, Bezier-curve vector paths.
While AI is fantastic for quick social media mockups or low-budget projects, brands that rely on visual perfection for millions in revenue will always rely on the human touch of professional clipping path services.
The Business of Photo Editing: Scaling Your Operations
For an e-commerce brand launching a new seasonal catalog, or an agency managing a high-volume client, editing photos in-house quickly becomes a bottleneck. A graphic designer’s time is highly valuable; spending 40 hours a week drawing clipping paths is not a cost-effective use of their creative skills.
This is where outsourcing product photo editing services becomes a strategic business decision.
Why Outsource?
- Speed and Scalability: Professional offshore clipping path agencies operate on a shift basis, often providing 24/7 coverage. You can send 1,000 unedited raw product photos on a Friday evening and have them back, perfectly clipped and formatted, by Monday morning.
- Focus on Core Competencies: By offloading tedious background removal, your in-house creative team can focus on what actually drives revenue: campaign ideation, web design, copywriting, and marketing strategy.
- Cost Efficiency: Hiring a full-time, in-house photo editor in North America or Europe carries high salary and overhead costs. Outsourcing allows you to pay per image, turning a fixed overhead into a variable cost that scales with your business needs.
Understanding the Cost of Bulk Background Removal Services
When researching the cost of bulk background removal services, it is important to understand that pricing is rarely flat. Reputable clipping path providers tier their pricing based on image complexity.
Here is a general breakdown of how the industry prices bulk image editing:
- Simple Complexity (approx. $0.39 – $0.99 per image): Objects with straight lines, round shapes, and zero holes. (Examples: Balls, simple boxes, smartphones, books). The editor can draw this path in under 2 minutes.
- Medium Complexity (approx. $1.00 – $2.50 per image): Objects with multiple curves, uneven edges, and a few hollow spaces (holes where the background shows through). (Examples: Shoes, handbags, basic clothing flat lays, cameras).
- High Complexity (approx. $2.50 – $5.00+ per image): Objects with intricate details, numerous closed paths, and complex geometry. (Examples: Bicycles, wire furniture, elaborate jewelry, machinery).
- Super Complex / Advanced Masking (approx. $5.00 – $10.00+ per image): Images requiring a mix of intense clipping paths and alpha-channel masking for hair, fur, or translucent materials such as glass or netting. (Examples: Models with flowing hair, fluffy pets, chainlink fences, sheer curtains).
When outsourcing, always request a free trial (most agencies offer 2-5 free images) to test their quality, turnaround time, and adherence to your specific instructions before committing to a bulk order of thousands of images.
Best Practices for Managing an Outsourced Workflow
To get the most out of your clipping path services and background removal for graphic design partners, you must establish clear communication and standardized workflows.
- Create a Strict Style Guide: Don’t leave things to chance. Provide a PDF document detailing exactly what you need. Specify the required margin around the product, the exact background color hex code (if not transparent), the desired file format (JPEG, PNG, PSD, TIFF), and the naming convention for the returned files.
- Specify Shadow Requirements: Do you want the natural shadow kept? Do you want a digitally created drop shadow? A reflection shadow? Clearly state this, as it changes the technique the editor must use.
- Utilize Cloud Storage & FTP: For bulk orders involving gigabytes of high-resolution RAW or TIFF files, standard email won’t work. Set up a secure FTP server or utilize robust cloud storage solutions like Dropbox or Google Drive with clearly labeled “To Do” and “Completed” folders.
- Implement Quality Control (QC): Even the best agencies make mistakes on massive bulk orders. Have a junior designer or intern perform spot-checks on returned batches. Look closely at the edges at 200% zoom to ensure there is no background halo and no jagged pixels.
Elevating Your Graphic Design with Flawless Imagery
The impact of visual presentation cannot be overstated. A beautifully designed website, an expensive ad spend, and a compelling marketing copy will all fall flat if the product photography looks cheap and poorly edited.
Clipping path services and background removal for graphic design are not just technical chores; they are the bedrock of visual merchandising. They separate the amateurs from the professionals.
By understanding the technical nuances—from pen tool techniques for precise object isolation to refining hair and fur edges in masking—you empower yourself to either execute these tasks flawlessly or manage outsourced teams effectively. You now know why professional clipping paths are better than AI tools when perfection is required, and you understand the immense value of advanced methods like the ghost mannequin effect for clothing photography and multi-clipping paths for color correction.
As you build your brand, remember that every pixel counts. A non-destructive photo editing workflow protects your assets, while high-end image masking for e-commerce guarantees that your products shine on a transparent background for product catalogs or crisp white backdrops.
Whether you choose to master how to remove complex backgrounds in Photoshop yourself or look into the cost of bulk background removal services to scale your operations, prioritizing high-quality image isolation will drastically improve your brand’s aesthetic, build consumer trust, and ultimately drive higher sales and engagement. In the competitive digital landscape, perfect imagery isn’t a luxury—it’s your most powerful asset.