
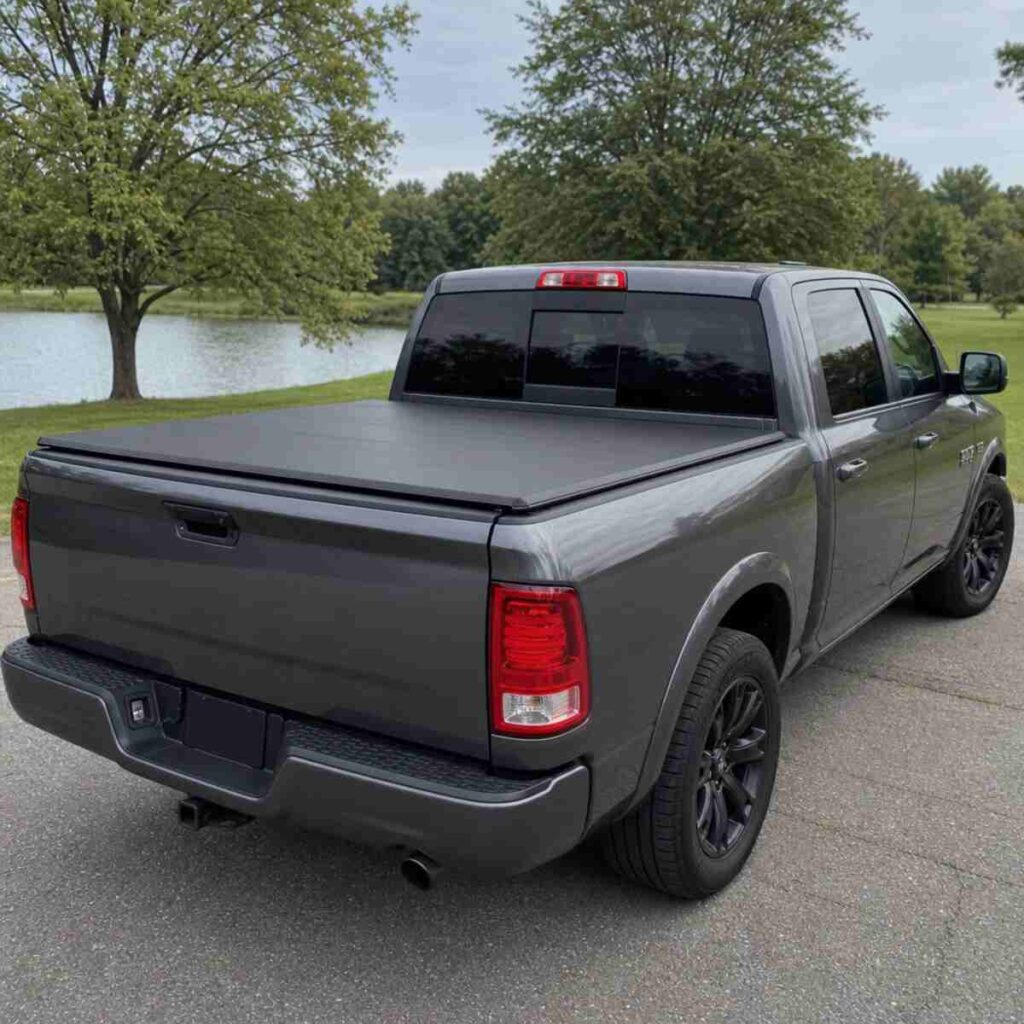
Whether you use your pickup truck for hauling heavy construction materials to a job site, carrying camping gear for a weekend off the grid, or simply getting groceries on a rainy afternoon, the truck bed is your most valuable asset. However, an open truck bed leaves your cargo completely exposed to harsh weather, road debris, and potential theft. This is exactly where a high-quality tonneau cover comes into play. Pick out the best tonneau cover.
Not only does a truck bed cover secure your belongings, but it also transforms your vehicle’s appearance while providing tangible aerodynamic benefits. If you have been looking for a comprehensive resource, you have found it. This complete Tonneau cover installation guide (step-by-step for pickup truck owners) will walk you through every phase of the process, from unboxing to the final adjustments.
By the end of this extensive guide, you will understand the nuances of various covers, know exactly how to prep your truck, and possess the expert knowledge needed to tackle a flawless tonneau cover installation in your own driveway.
Phase 1: Pre-Installation Preparation and Planning
Before you even touch a wrench or open a cardboard box, successful tonneau cover installation begins with meticulous preparation. Rushing into the assembly process without verifying your equipment or measurements is the most common reason for installation failure, misaligned rails, or worse—a cover that simply does not fit.
Verifying Pickup Truck Bed Rail Measurements
The pickup truck market is vast, and bed sizes vary wildly not just between manufacturers like Ford, Chevrolet, Ram, and Toyota, but also between different model years and trim levels of the same truck.
Taking accurate pickup truck bed rail measurements is your crucial first step. Never rely solely on the manufacturer’s brochure; always measure your actual truck before purchasing or attempting to install a cover.
How to Measure Your Truck Bed Properly:
- Length (Bulkhead to Tailgate): Place your tape measure at the inside edge of the bulkhead (the wall of the truck bed closest to the cab). Pull the tape straight back to the inside edge of the closed tailgate.
- Width (Side to Side): Measure the distance between the inside lips of the left and right bed rails at three points: near the cab, in the middle, and near the tailgate. This ensures your bed is not bowed out.
- Check for Accessories: Note any drop-in bed liners, over-the-rail liners, track systems (such as the Toyota deck rail system), or utility racks. These can significantly alter how a cover mounts and may require specific adapters.
Do Tonneau Covers Require Drilling?
One of the most frequent questions from truck owners is: do tonneau covers require drilling?
For the vast majority of modern truck bed covers, the answer is a resounding no. Manufacturers have heavily innovated their designs to utilize the existing factory lips of your truck’s bed rails. Most systems utilize heavy-duty, aircraft-grade aluminum clamps that secure the cover’s rails to the truck without permanently altering the vehicle.
However, there are a few exceptions where minor drilling might be necessary:
- Older Truck Models: Trucks manufactured before the late 1990s might lack the internal rail lip required for modern clamps.
- Retractable Covers: When installing retractable tonneau cover drain tubes (more on this later), you might need to drill small holes in the factory plastic bed plugs to route the tubes outside the bed.
- Heavy-Duty Utility Covers: Certain highly specialized, heavy-duty covers designed to support hundreds of pounds of gear on top might require bolt-on mounting systems that need drilling for absolute structural integrity.
Gathering Essential Tools for Truck Bed Cover Assembly
Having the right tools on hand will shave hours off your installation time and prevent sheer frustration. While many modern covers are marketed as “no-tool installations” (featuring hand-tightened knobs), utilizing actual hand tools ensures a much more secure and weather-tight fit.
Here are the essential tools for truck bed cover assembly:
- Socket Wrench Set: A standard 3/8-inch drive ratchet. You will most commonly need 1/2-inch, 9/16-inch, or 10mm to 14mm sockets depending on the clamp hardware.
- Wrenches: A set of open-end or combination wrenches for holding nuts in place while tightening bolts.
- Allen Wrenches (Hex Keys): Often included in the box, but having your own high-quality set provides better leverage.
- Tape Measure: Essential for ensuring your rails are perfectly parallel and spaced correctly from the bulkhead.
- Spring Clamps: Highly recommended. Use these to temporarily hold the tonneau rails in place against the truck bed while you align everything and tighten the permanent clamps.
- Scissors or Utility Knife: For trimming weather stripping.
- Isopropyl Alcohol and Microfiber Cloths: Crucial for cleaning the truck bed surfaces before applying adhesive weather seals.
- Work Gloves and Safety Glasses: To protect your hands from sharp metal edges and eyes from debris.
Phase 2: Understanding Mounting Systems and Cover Types
Not all tonneau covers are created equal, and neither are their mounting systems. Understanding exactly what you are installing will help you anticipate the specific challenges your model may face.
Clamp-on vs Bolt-on Mounting Systems
When it comes to securing the rails of your tonneau cover to the truck, you will generally encounter two philosophies: clamp-on vs bolt-on mounting systems.
Clamp-On Systems:
- Pros: Fast installation, completely non-destructive (no drilling), easy to remove if you need full access to the bed for an oversized load, widely available across all price points.
- Cons: Clamps can occasionally loosen over time due to road vibrations; they intrude slightly into the bed space, which might interfere with certain cargo management systems.
- How it works: The system uses a C-clamp or a specialized tooth-clamp. One side bites under the metal lip of the truck’s bed rail, while the other side grips the aluminum rail of the tonneau cover. As you tighten the bolt, it draws the two together, creating a friction fit.
Bolt-On Systems:
- Pros: Incredible strength and rigidity. Bolt-on systems are virtually immune to loosening from standard road vibration. Ideal for heavy-duty covers that support external loads (such as overlanding tents or ladder racks).
- Cons: More complex installation. It may require drilling into the truck bed, making the installation permanent. Harder to remove quickly.
- How it works: The cover’s framework is bolted directly through the sheet metal of the truck bed, or it utilizes factory-threaded inserts (if your truck is equipped with them) to create a mechanical bond.
Tonneau Cover Comparison: Finding the Right Fit
Before you install, it helps to understand the engineering behind your specific cover. If you are still in the purchasing phase and reading this to gauge how difficult installation will be, here is a brief comparison of tonneau covers to help you identify the best one for your specific lifestyle. 1. Soft Roll-Up Covers
These feature a heavy-duty vinyl or canvas material stretched over an aluminum frame. They roll up toward the cab, secured by straps or buckles.
- Installation Difficulty: Easy (1-2 hours).
- Key Consideration: Tension adjustment is critical to prevent the material from flapping in the wind.
2. Hard Folding Covers (Tri-Fold or Quad-Fold)
Constructed from aluminum, fiberglass, or hard polymer panels. They fold back in sections and usually feature a very low profile.
- Installation Difficulty: Easy to Moderate (1-3 hours).
- Key Consideration: Perfect alignment at the bulkhead is required to ensure the latches align with the rails when closing.
3. Retractable Covers
The most technologically advanced covers. Slatted aluminum or polycarbonate panels roll up into a canister mounted at the bulkhead, operating much like a garage door.
- Installation Difficulty: Moderate to Advanced (2-4 hours). Requires two people.
- Key Consideration: The canister occupies bed space, and installing retractable tonneau cover drain tubes is mandatory to prevent rainwater from filling it.
Soft vs Hard Tonneau Cover Durability
When handling the components during installation, you will immediately notice the difference in soft vs hard tonneau cover durability.
Soft covers are incredibly lightweight, which makes installation a breeze for a single person. However, the vinyl material is susceptible to punctures, heavy snow loads, and UV fading over time. When installing a soft cover, be careful not to pinch the vinyl in the clamps.
Hard covers feature robust aluminum or composite panels. They are heavier (often weighing between 50 to 90 lbs), which is why having an extra set of hands during installation is highly recommended. Their durability is unmatched, capable of withstanding heavy snow and ice, and of supporting hundreds of pounds of distributed weight. The trade-off is a slightly more demanding installation process to ensure those heavy panels align perfectly with the locking mechanisms.
Phase 3: Step-by-Step Installation Guides
Now we dive into the core of the installation. Because the process varies significantly depending on the cover style you purchased, we have broken it down into three specific guides. Find the section that matches your cover type.
Guide A: How to Install Roll Up Tonneau Cover (Soft & Hard)
Roll-up covers are incredibly popular due to their cost-effectiveness and full bed access. Whether it is a soft vinyl cover or an interlocking hard-slatted roll-up, the installation’s foundation is identical.
Step 1: Prep and Clean the Bulkhead Wash the truck bed rails and the bulkhead (the front wall behind the cab) thoroughly. If your truck does not have a factory drop-in liner that covers the bulkhead, you will need to apply the provided weather seal here. Wipe the area with isopropyl alcohol, let it dry, then stick the foam weatherstripping flush with the bulkhead’s inner edge.
Step 2: Position the Side Rails Take the driver-side tonneau rail (usually marked with a sticker or distinct latching mechanism at the tailgate end) and place it on top of the truck’s bed rail. Push it all the way forward so it touches the bulkhead.
Actionable Tip: Use a pair of spring clamps to hold the rail in place. Make sure the top of the tonneau rail is perfectly flush and level with the top of the truck’s bed rail cap.
Step 3: Attach the Clamps loosely Most roll-up covers use three clamps per side.
- Place the first clamp about 6 to 8 inches from the bulkhead.
- Place the second clamp directly in the center of the rail.
- Place the third clamp about 6 to 8 inches from the tailgate.
Thread the bolts into the clamps finger-tight. Ensure the teeth of the clamp are fully seated into the grooves of the tonneau rail.
Step 4: Align and Tighten Apply downward pressure on the tonneau rail to compress the weather seal against the truck bed, and begin tightening the clamps with your socket wrench. Start from the front (cab) and work your way to the back (tailgate). Warning: Do not overtighten. Applying too much torque can bow the aluminum rail or damage your truck’s plastic bed caps. A firm, snug fit (usually around 10-15 ft-lbs of torque) is sufficient. Repeat steps 2-4 for the passenger side.
Step 5: Mount the Cover Assembly. Take the rolled-up cover assembly and place it behind the cab, resting across the two newly installed side rails. Most systems will have a tension bolt or a sliding track mechanism that slides into the front of the side rails. Secure the front header bar to the rails using the provided hardware (often a specialized bolt and a cotter pin or locking nut).
Step 6: Unroll and Latch. Unroll the cover toward the tailgate. As it unrolls, the sides should easily drop into the tracks or catch the velcro strips. When you reach the tailgate, push the rear header bar down into the latching mechanism until it clicks securely.
Step 7: How to Adjust Tension on Roll Up Covers. This is a critical step that many overlook. A roll-up cover needs to be drum-tight to shed water and prevent wind-flap, which can destroy fuel economy and the cover itself. If the cover is too loose (flapping) or too tight (you have to force the tailgate latch to close with excessive strength), you must adjust the tension.
Look at the front header bar near the cab. Most covers feature a tension adjustment dial or a threaded bolt on each side.
- In Summer: Heat makes vinyl expand and stretch. You will likely need to increase the tension by turning the dial or moving the bolt outward to tighten the cover.
- In Winter: Cold makes the material contract and become stiff. You may need to decrease the tension so the cover can actually reach the tailgate latches.
- Always adjust both the driver and passenger sides equally to keep the cover square.
Guide B: Mounting Hard Folding Truck Bed Covers
Hard folding covers (tri-folds and quad-folds) offer excellent security and a sleek look. They generally come in two styles: those that sit on top of the bed rails and those that sit flush inside the bed rails for a streamlined appearance.
Step 1: Apply Bulkhead Seal Just as with the roll-up covers, if your bulkhead is lower than your side bed rails, you must apply the provided thick foam weather seal across the bulkhead to create a level surface for the cover to sit on. Clean with alcohol, peel the backing, and press firmly.
Step 2: Install Side Rails (For Flush-Mount Models Only) (Note: If you have a top-mount tri-fold that comes fully assembled in one piece, skip to Step 4). If your hardcover sits flush inside the bed, it will come with two separate side rails. Using spring clamps, temporarily hold the driver-side rail flush against the inside lip of the truck bed. The top of the tonneau rail should be perfectly level with the top edge of the truck’s plastic bed cap.
Step 3: Secure the Rail Clamps. Position the three clamps evenly along the rail (front, middle, rear). Ensure the clamp sits as high as possible in the corner of the rail to maximise grip. Tighten the clamps sequentially, starting from the cab, applying downward pressure on the rail as you go. Repeat for the passenger side.
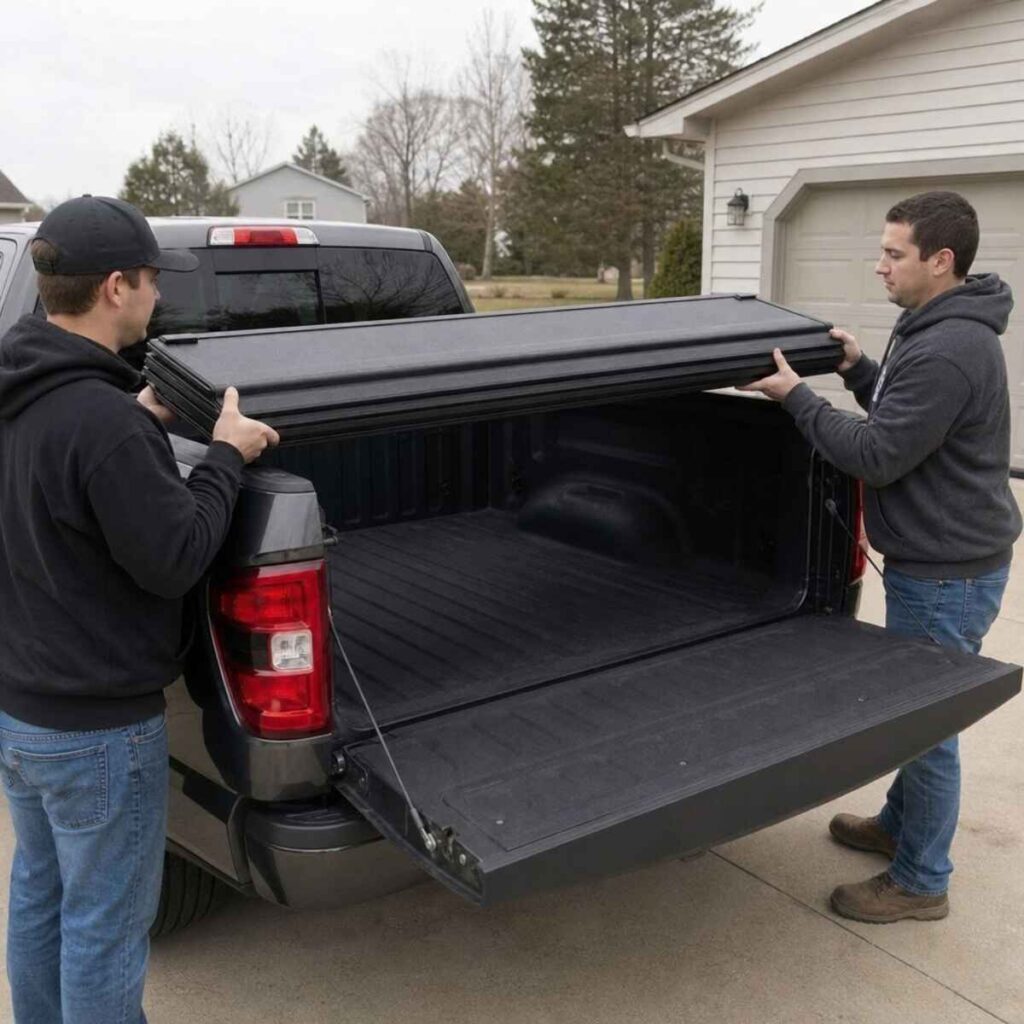
Step 4: Position the Folded Cover. With the cover completely folded up and strapped securely, lift it (with a helper!) and set it on the front of the truck bed near the cab.
Step 5: Align the Cab Header. This is the most crucial step in mounting hard folding truck bed covers. Unclip the safety straps and unfold the cover once or twice (do not unfold it completely to the tailgate yet). Look at the alignment. Is the cover sitting perfectly square? Ensure there is an even gap on the left and right sides. More importantly, check the bulkhead placement. The front rubber seal of the cover should rest squarely on the bulkhead (or the weather seal you installed), overlapping it by at least half an inch to prevent water intrusion.
Step 6: Secure the Front Clamps Once the cover is perfectly aligned, gently fold it back up toward the cab without shifting its position. Climb underneath the cover (inside the truck bed near the bulkhead). Most hard-folding covers use a T-handle clamp or an elevator-bolt system at the front. Tighten these front clamps securely. These are the anchor points for the entire cover, so they must be tight.
Step 7: Unfold and Test Latches Unfold the cover completely toward the tailgate. As you drop each panel, verify that the locking jaws or slam-latches engage the lips of the side rails perfectly. When you reach the final panel at the tailgate, push down firmly. You should hear a distinct click on both the driver and passenger sides. If one side clicks and the other doesn’t, or if the cover hits the tailgate prematurely, your rails are out of square. (See the Troubleshooting section below).
Guide C: Installing a Retractable Tonneau Cover
Retractable covers offer the ultimate in convenience and security, but they are the most complex to install due to the heavy canister housing.
Step 1: Assemble the Canister and Rails (Off the Truck) Unlike other covers, a retractable cover often requires pre-assembly on the ground or a large workbench. You will have the main canister (which houses the rolled-up cover) and two long side rails. Slide the driver and passenger side rails into the side slots of the canister. The rails will usually attach to the canister with a set of Phillips-head or Torx screws. Ensure these screws are exceptionally tight, as they form the frame of the entire system.
Step 2: Lift the Assembly onto the Truck. Do not attempt this alone. The assembled canister and rails can weigh in excess of 100 pounds and are awkward to maneuver. With a helper on the opposite side, lift the entire assembly and walk it over the truck bed. Carefully lower the canister near the bulkhead, allowing the side rails to rest on the truck’s bed rails.
Step 3: Positioning the Canister Push the entire assembly as far forward toward the cab as possible. Depending on the brand, a specific distance (usually measured in fractions of an inch) is required between the canister and the truck’s bulkhead. Use the measuring block or spacer usually provided in the hardware kit to set this exact distance.
Step 4: Leveling the Tracks Retractable covers demand absolute precision. If the tracks dip or bow, the cover will bind and refuse to roll smoothly. Before tightening any clamps, check the side rails. Many kits include small set screws or leveling arms that push against the inside of the truck bed to level the track. Adjust these screws until the tracks are perfectly parallel to the ground and square to each other.
Step 5: Clamp It Down. Install the clamps similarly to the other covers (front, middle, rear). Because a retractable cover’s operation relies on smooth tracks, tighten the clamps evenly, alternating between the front, middle, and rear to ensure you don’t accidentally twist the aluminum rail.
Step 6: Installing Retractable Tonneau Cover Drain Tubes. This is a mandatory step. When it rains, water will enter the canister housing. If it cannot escape, it will overflow into your truck bed and potentially ruin the rolling mechanism.
- Locate the pre-drilled drain holes at the bottom or sides of the canister.
- Push the provided flexible plastic drain tubes onto these fittings.
- Route the other end of the tubes out of the truck bed. Most modern trucks have oval-shaped factory rubber or plastic drain plugs in the bulkhead or the bed floor near the cab.
- Remove the factory plug, drill a hole in it just large enough for the tube to pass through, run the tube through the plug, and snap the plug back into the truck bed. Ensure the tube points down toward the road so gravity can do its job.
Step 7: Test the Operation Pull the release latch and slowly pull the cover toward the tailgate. It should glide smoothly on its sealed ball bearings. If it binds, catches, or requires excessive force, your side rails are too tight, not leveled, or pitched inward. Loosen the clamps, readjust the leveling screws, and try again.
Phase 4: Mastering Weatherproofing and Clearances
A tonneau cover’s primary job is to protect your cargo. However, many truck owners are disappointed when they find puddles of water in their bed after a heavy rainstorm. The truth is, very few covers are 100% waterproof right out of the box. Achieving maximum weather resistance requires attention to detail during and after installation.
Preventing Water Leaks in Truck Bed
To master preventing water leaks in truck bed areas, you must understand how water moves over your vehicle. When driving in the rain, aerodynamics push water forcefully against the bulkhead (where the cab meets the bed) and the tailgate.
Common Leak Points to Address:
- The Bulkhead Gap: As noted in the installation steps, the truck’s bulkhead is often slightly lower than the side rails. If you do not apply a thick foam weather seal across this gap, water will pour in.
- Stake Pocket Holes: Many trucks have square holes cut into the bed rails for mounting ladder racks. If your tonneau cover does not completely cover these holes, water will drop straight through. You can purchase inexpensive rubber stake pocket plugs online to seal these up.
- Bed Rail Caps: Factory plastic bed caps are ribbed. Water can sometimes channel through these ribs beneath the tonneau cover’s rubber seals. Applying a thin bead of clear automotive silicone beneath the tonneau rails is a permanent solution, though standard weather stripping usually suffices.
Weather Stripping for Truck Bed Protection
Using high-quality weather stripping for truck bed protection is the best way to upgrade a budget cover into a highly weather-resistant vault.
If your cover leaks along the sides, you can purchase aftermarket EPDM rubber seals. These have an automotive-grade 3M adhesive backing. To install:
- Identify the exact location of the leak (looking inside the bed during daylight with the cover closed will reveal gaps where light shines through).
- Thoroughly clean the truck bed surface with isopropyl alcohol. Any dirt or wax will prevent the adhesive from sticking.
- Apply the weather stripping slowly, pressing firmly to remove air bubbles.
- Let it cure for 24 hours before getting it wet.
Dual-Action Tailgate Seal Installation
The single largest source of dust and water intrusion in any pickup truck is the tailgate. The gaps on the sides and bottom of a tailgate are massive. Even with the best tonneau cover in the world, driving down a dirt road will create a vacuum effect that sucks dust up through the tailgate gaps and into the bed.
The solution is a dual-action tailgate seal installation. A dual-action seal is a specific type of rubber gasket designed to compress when the tailgate closes, sealing both the side walls and the floor gap.
How to Install a Tailgate Seal:
- Clean the side jambs and the lower edge of the truck bed where the tailgate closes.
- Cut the seal to length. You will need one long piece for the floor and two shorter pieces for the vertical side jambs.
- Peel the adhesive backing and stick the seal to the truck bed side (not the moving tailgate).
- For the floor, align the seal so that the bulbous part of the rubber compresses perfectly against the bottom edge of the tailgate when it closes.
- Close the tailgate and leave it shut for a few hours to allow the adhesive to bond under pressure. This small, inexpensive addition drastically improves the weatherproofing of your entire tonneau system.
Low Profile Truck Bed Cover Clearance
A major trend in the industry is the low-profile cover. These covers sit completely flush with the top of the bed rails, creating a remarkably sleek, aerodynamic aesthetic.
However, low profile truck bed cover clearance is a crucial factor you must account for during installation and daily use.
- Internal Cargo Clearance: Because the cover sits inside the bed rails, the physical depth of your truck bed is reduced by about 1 to 2 inches (depending on the thickness of the cover’s panels). If you regularly transport items that are exactly the height of your bed rails (such as certain coolers, toolboxes, or generators), a low-profile cover might prevent them from sliding under.
- Interference with Accessories: Flush-mount side rails intrude into the width of the truck bed by an inch or two on each side. If you use a bed extender, a drop-in cargo divider, or tie-down cleats that mount to the inside walls of the bed, you must verify they will not hit the tonneau cover’s track system.
Phase 5: Troubleshooting Misaligned Tonneau Cover Rails
Even if you follow every step perfectly, the nature of mass-produced vehicles means that sometimes things just don’t line up. Troubleshooting misaligned tonneau cover rails is a normal part of the final installation process. Do not panic if your cover doesn’t latch on the first try.
Here are the most common issues and how to fix them:
Issue 1: The Cover is Too Short (Cannot Reach the Tailgate)
You unroll or unfold your cover, and it falls half an inch short of the tailgate latch.
- The Fix: Your side rails are pushed too far forward. Loosen the clamps on the side rails. Pull both rails slightly toward the tailgate (about a quarter inch) and re-tighten. Furthermore, if it is a soft roll-up cover, check the tension adjusters at the front header. You may have the tension set too high, preventing the material from reaching the rear.
Issue 2: Only One Side of the Cover Latches
You press down on a hard-folding cover or the header of a roll-up, and the driver’s side clicks perfectly, but the passenger side refuses to latch.
- The Fix: Your truck bed or your newly installed rails are out of square.
- Take your tape measure. Measure the distance between the two side rails at the bulkhead (front).
- Measure the distance between the two side rails at the tailgate (rear).
- If the rear measurement is wider than the front, the side rails are bowing outward. The latching mechanism cannot reach the catch. Loosen the rear clamps, physically push the rails closer together, and re-tighten.
Issue 3: The Cover is Hard to Close or Grinds
When closing a retractable or roll-up cover, it feels like it is dragging on sandpaper.
- The Fix: First, verify the rails are parallel (as mentioned above). If they are, the rails might be pitched inward or outward. When you tighten clamps, they can sometimes cause the aluminum rail to twist, pitching the top lip upward or downward. To fix this, loosen the clamps, ask a helper to apply level downward pressure on the top of the rail, and re-tighten. Some premium brands include pitch-adjustment screws on the clamps to actively push the bottom of the rail away from the truck wall, keeping the top perfectly flat.
Issue 4: Clamps Slipping Over Time
You install the cover, it looks great, but a month later, the whole assembly has shifted sideways.
- The Fix: Metal expands and contracts with temperature changes, and road vibration is relentless. It is highly recommended to check and re-torque all of your clamps roughly 100 miles after the initial installation. If slipping persists, ensure the teeth of the clamps are actually seated in the grooved tracks of the aluminum rail, not just resting on a flat edge.
Phase 6: Long-Term Maintenance and Aerodynamic Benefits
Installing your tonneau cover correctly is only the beginning. To protect your investment and ensure it lasts the lifetime of your truck, you must commit to some basic maintenance. Furthermore, understanding the functional benefits of your newly installed cover will help you maximize its value.
Maintaining Your Tonneau Cover
Regardless of the materials—vinyl, aluminum, or polycarbonate—environmental factors will attempt to degrade your cover.
For Soft Roll-Up Covers:
- Cleaning: Wash the vinyl material with standard car wash soap and water. Avoid harsh detergents or dish soap, which will strip the natural oils from the vinyl.
- UV Protection: The sun is the enemy of vinyl. Once a month, apply a dedicated tonneau cover protectant (or a marine-grade vinyl protectant). Avoid silicone-based tire shines (like Armor All), as they will cause the vinyl to dry out and crack over time, and they leave a greasy residue that attracts dust.
- Tension: Continuously monitor and adjust the tension dial as the seasons change, as discussed in the how to adjust tension on roll up covers section.
For Hard Folding Covers:
- Seal Lubrication: The EPDM rubber hinges connecting the rigid panels can dry out. Spray them with a silicone-based lubricant or a rubber protectant twice a year to keep them supple and prevent water leaks.
- Drainage: Ensure the tracks where the panels sit are free of leaves, pine needles, and debris.
For Retractable Covers:
- Track Lubrication: The side rails house ball bearings or glides. Never use WD-40 or heavy grease in these tracks. Dirt and grit will stick to the grease, turning it into a grinding paste that will destroy the bearings. Instead, use a dry Teflon spray or a specialized dry graphite lubricant.
- Clear the Canister: Regularly check your retractable tonneau cover drain tubes. Blow compressed air through them occasionally to ensure they are not clogged with debris.
Improving Fuel Economy With Truck Bed Covers
One of the most debated topics among truck enthusiasts is whether a tonneau cover actually pays for itself at the gas pump. The short answer is: Yes, it can.
Understanding how truck bed covers improve fuel economy requires a basic grasp of aerodynamics. As your pickup truck moves down the highway, air flows over the hood, up the windshield, and over the roof.
In a truck with an open bed, that fast-moving air drops off the back of the cab and crashes directly into the closed tailgate. This creates a massive pocket of aerodynamic drag—essentially acting like a parachute dragging behind your vehicle. The engine has to work harder, burning more fuel, to pull that “parachute” through the air.
When you install a tonneau cover, you create a smooth, flat surface from the top of the tailgate to the cab. The air flowing over the roof now glides seamlessly over the bed and slips off the rear of the truck.
The Real-World Results: Wind tunnel tests and independent studies (including those by SEMA and various university engineering departments) have shown that a high-quality, tightly fitting tonneau cover can reduce aerodynamic drag by 10% to 11%.
Depending on your driving habits, the speed you drive (aerodynamic drag is exponentially worse at highway speeds), and your specific truck model, this drag reduction translates into roughly 1 to 2 miles per gallon (MPG) improvement.
While 1 to 2 MPG might not sound like a lot on a single trip, over the course of a year, and the lifetime of your truck, the fuel savings can be substantial. For many drivers, the cover completely pays for itself in fuel savings over a few years, making the initial investment incredibly worthwhile.
Conclusion
Taking the time to research, purchase, and properly install a tonneau cover is one of the best decisions you can make for your pickup truck. It transforms an open, vulnerable cargo space into a secure, weather-resistant vault, while simultaneously giving your truck a streamlined, customized appearance.
As we have covered in this extensive guide, successful installation is entirely within your grasp, regardless of your mechanical experience. By taking meticulous pickup truck bed rail measurements, gathering the essential tools for truck bed cover assembly, and carefully following the step-by-step procedures for your specific cover type, you can achieve a professional-grade fit in your own driveway.
Remember that patience is your best tool. Take the time to apply proper weather stripping for truck bed protection, ensure your rails are perfectly square, and meticulously adjust the tension or alignment before tightening the final clamps. A rushed installation leads to water leaks and frustration, while a careful, methodical approach yields years of durable, hassle-free performance.
Your truck works hard for you. By following this guide and installing a top-tier tonneau cover, you are finally giving your truck bed the protection and respect it deserves. Now get out your socket set, unbox that new cover, and get to work!